Translate

26 May 2012

Playmate is back!!!!

So after escaping the Playboy fever for more than a month, I have caught it again. (my last playboy themed art was on 13th April,12).
Mr.Hefner, PLEASE HELP!!!!


I was so intrigued by this photograph, that I couldn't help but make something of it.
So, I made a 3D Decoupage of it, as I love making 3D Decoupage, this is my 2nd one.
They are easy to make and bring inanimate things to life.
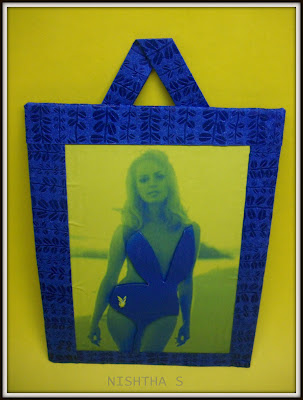
I used coloring tool to change the color of the original photograph to Duo tone and also added a small playboy bunny to the picture and then color printed it.
I hand cut the playboy bunnies (small yellow one and the large black one, which is the model's swim suit). I then pasted these hand cut bunnies on the photograph. 
Once both the pieces were dried, I pasted the entire photograph on a card board (you can see how bad I'm at pasting with creases on the photograph, this is cause of excess glue used).
After the card board image was dried, I pasted the blue hand-made paper frame that I made on the photograph.
Finally to hang it, I added a small inverted 'V' paper strip on the backside of the frame.


|||||||||||||||||||||||||||||||||


Self Rating - 6.75/10
Status - Happy with the idea, but execution could have been better.
Tip - use tape runner while working with thin paper for your craft to avoid creses being formed while pasting.


Am I a playboy fanatic??? 
Does this craft deserve a 6.75???
Let me know what you think


      -May ART be with you©


20 May 2012

Lin's Giveaway...


Lin Handmade Greeting Cards is giving away this awesome box of goodies to one lucky winner this month!!!!  


The box contains 3 different colours of handcut glitter foams hearts, 3 different colours of foam alphabets and numbers, some colourful ink pens for stamping, some colourful colour pencils, some sponge stickers, some handcut felt flowers, some foam stamps, colourful buttons, a small flower craft punch and last but not least some colourful Popsicle sticks for making bookmarks.


All you gotta do is either of these:


1. "LIKE" her Facebook Fan Page or "Follow" her blog 
2. Blog about this giveaway on your blog OR put the link of this giveaway on your Facebook profile.
3. Go back to this post and write your name and your URL link.


So, go ahead and spread the word. 


YOU MAY BE THE LUCKY WINNER!!!!


-May ART be with you.


13 May 2012

~~~ MY DOC-MOM ~~~

After making my mom a Mother's Day card (posted on 6th May, 12), I decided to make a Mother's Day card for my would-be mother-in-law.


As she is a doctor, I wanted to make something related to her profession and hence I came up with this.
I found the stethoscope image on the Internet and added the text on my own and created this image for the card. I color printed it on a 5x7in plain paper.
To add depth and texture to the card, I pasted the printed image on a red chart paper.
Once the red bordered image was ready, I cut out a handmade Chinese paper into an unfolded card shape that would fold into half and open vertically. I then pasted the red bordered image on the front of the card.
Finally I added white chart paper on the inside to write the message. The message reads - 'To, sweetest Aunty...You are no less than my mom to me... Lots of Love -Nishtha"

Apprehensively, I gave her the card today at dinner and she loved it... (PHEW!!!)


xoxoxoxoxoxooxoxoxoxox


Self Rating: 9/10
Status: I and my Mom-in-law are happy.
Tip: Either print the message to be written inside the card or ask someone with good handwriting  to write it for you (I wrote it myself and as you can see, its not the most beautiful handwriting)

Let me know what you think of this professional themed card.


                                                                                                -May ART be with you©

P.S. - I gave my "MUMMY" themed card to my Mom and she loved it. So both my MOMs are happy. 

Happy Mother's Day.

6 May 2012

||| MOMMY RETURNS |||

The inspiration for this card came from the homonym - 'MUMMY', which mean Mother and Egyptian mummified body.
So I wanted to combine the two, make a card for my MUMMY using something of Egyptian MUMMY theme.
So, I started by cutting out an image of a girl offering a bouquet to her mom on a cardboard and covered the mom and the girl in 3mm golden quilling strips (I tried to give the effect of the way Egyptian mummies are wrapped). The bouquet was wrapped in 3mm maroon and green strips.
I then pasted the three wrapped images on a black base, which was made by covering a border-shaped cut-out cardboard with 10mm black quilling strips (again trying to replicate the Mummy effect). 
Once the image was  pasted firmly, I added colour printed writing on the side on the image - "my mommy best" (again using different kind of font to give it Egyptian look)
I then pasted the entire black cut-out with images and writing onto a black and golden handmade paper, which I cut out in the shape of a card.
Finally, I added a yellow chart paper on the inside of the card, to write the message.
Cant wait to give it to her - my MOMMY!!!!
||||||||||||||||||||||||||||||||||||||||||||||||||


Self Rating: 8.75/10
Status: I am happy with it, I hope my Mom likes it too (this is my 1st hand made card for her) 
Tips: Definitely keep a wet hand towel with yourself or you'll get dried glue all over your project.


Let me know what you made for your MUMMY.


                                                                                                -May ART be with you©


5 May 2012

Under the Cowl

I love to wrap my gifts in unique, hand made and personalized wraps, hence when I gifted the comic book 'Batman Under the Cowl' to SID-B (a Batman fanatic), I wrapped it in this Batman themed wrapping.
I started by gathering and color printing batman related images. 
For the wings, I found this cloth wings image and cropped it in two. To get the wing's folds accurately, I added dotted lines on the cropped image using coloring tools.


I then covered the comic book with black chart paper till about 70% of the length and cut out all the images gathered. 


Finally I pasted all the cut out images - the Batman logo on the front of the black cover, the mask on the inside and the folded wings on the back of the cover.


My DARK KNIGHT is ready to save the GOTHAM CITY!!!!

||||||||||||||||||||||||||||||||||||||||||||||||||

Self Rating - 9/10
Status - ELATED


Try a unique wrap yourself and share it with me.


                                                                                                -May ART be with you©

27 Apr 2012

JIG -- SAW!!!!

I'm flooded with paper jewelry ideas, so here is another one...

I made these cardboard jigsaw pendants


I started by cutting out the jigsaw shape I desired on a card board and filed the edges to make them smooth.


I then color printed random images and cut them out in shape of the card board and pasted them on the base pendant(card board cutout).


Once the image was dried, I painted the back side of the card board with acrylic colors.


To make them sturdy and add sheen, I coated them with varnish and left them to dry overnight.


Finally I punched a hole in the finished pieces (not very neatly though) and added a woolen black string to them.

Waiting to flaunt them!!!

||||||||||||||||||||||||||||||||||||||||||||||||||

Self Rating - 7/10
Status - Happy, but could be neater
Tip - You could use old jigsaw puzzle pieces to make this


So, go ahead and make it and let me know how it goes.


                                                                                                -May ART be with you©

22 Apr 2012

Paper GEMS!!!!

My latest addiction is paper jewelry, cant stop thinking about it, nor can stop making it

I learnt watercoloured paper jewelry makng from Ross Barbera's blog. I loved the idea so much that I had to try it. 

So here is my take on her art. I made these four pendants.
I used drawing paper and three water colours - blue, green and yellow to make these.

I randomly dabbed colours(mixed with water) on the paper till the entire sheet was covered. Once done, I sprinkled cooking salt on the colours (this gives the textured look) and left it to dry over night.
Once the sheet was completely dried, I scrubbed off the excess salt and cut out two pieces of each shape desired (for front and back)
I also cut out the two exact same shape of each piece in plain paper.  So I had four pieces of each shape.

I pasted the black string in between the two plain paper pieces and stuck them together with glue.
Once the string was firmly attached, I pasted the coloured paper pieces on front and back of the base pendant (made of plain paper with sting in between) and left them to dry overnight.
Finally I coated them with varnish. 
And they were ready to be flaunted!!! 

 ||||||||||||||||||||||||||||||||||||||||||||||||||

Self Rating - 7.75/10
Status - Happy, but need to so better
Tip - sprinkle the salt when the colours are wet, or the textured effect wont come

So try it and let me know how it goes.


                                                                                                -May ART be with you©

15 Apr 2012

So cracking!!!

 have been so inspired by handmade jewelry, that I couldn't help but try one myself.
This is my 1st handmade piece which I learned from BeyondBracelets on youtube, but made alterations according to the craft supplies available to me.


I started by cutting the cardboard in the shape that I desired to make the pendant in, then cracked and pasted pieces of boiled egg-shell on the base.
Once all the pieces were pasted, I filed the edges of the pendant to smoothen them and remove any excess egg-shell.
To make it durable, I coated the pasted egg-shell pieces with glue and water mixture(70% glue & 30% water) and left it to dry overnight.
Once it was completely dried, I painted the egg-shell side with transparent colors and the back side with acrylic color. 
Finally sprayed the completed pendant with craft varnish, punched a hole in it and added the silver chain.

||||||||||||||||||||||||||||||||||||||||||||||||||||||||||||

Self Rating - 9/10
Status - Very happy with the outcome
Tip - punch the hole before coloring the piece

Try it yourself, its easy, fun to make, and super cool to wear.

Let me know how it goes.


                                                                                                -May ART be with you©


13 Apr 2012

TWO is better than ONE

I am sure this month is 'International Playboy Month', as I cant explain why I keep making Playboy/Playmate themed art project. 

Mr.Hefner, are you listening??? ;-)


Here is my latest one: TWO is better than ONE
My inspiration to make this, came from the model herself. I dont know who she is, but I loved her photo and decided to make something with it and thus was born this project (which I intend to frame soon) 
I used coloring tools to give the original picture a 'negative of a photograph' look.
I colour printed the edited photo and stated to work on it.


The 1st one is made with IRIS folding technique, for which I have hand cut the parts out (used my craft knife for the 1st time)
I used 3 fluorescent colours - Pink for the lingerie, Green for the bunny ears and Yellow for the playboy bunny in the basket.
I experimented with IRIS folding this time, instead of using paper strips, I folded a single piece of paper and pasted it. It worked great, looks just like the actual IRIS folding.


The 2nd one is 3D decoupage, this is my 1st decoupage project. 
I used all the hand cut parts from the previous picture to make this one.
To give it the 3D effect, I pasted small pieces of cardboard on backside of each hand cut part and pasted it on the original picture. 
Finally, I pasted both the finished pictures on Indigo Blue paper and added the golden and turquoise hand made paper border to give it a complete look.


||||||||||||||||||||||||||||||||||

Self Rating - 8/10
Status - Happy with the outcome
Tips - you could use double sided tape instead of cardboard for 3D decoupage
Suggestions - Try the new IRIS folding method and let me know how it worked for you.
Changes I could make - would definitely get it framed


Let me know what you think? Do i deserve a 8/10???


      -May ART be with you©