Translate

Showing posts with label Handcut craft. Show all posts

15 Jul 2012

SHOW me the MONEY!!!!

I made my 1st money envelop for Rakshabandhan, which is on 2nd Aug (a Hindu festival for siblings, where sister ties a decorated thread called Rakhi on her brother's wrist, as a symbol of responsibility that she bestows on him to protect her and in return, he showers her with money/gifts/sweets,etc for this homour).
I made this for myself, to it give to my Mom, who will load it with cash and hand it to my younger brother to give it to me. (YES! :-D)

a still of Rakshabandhan
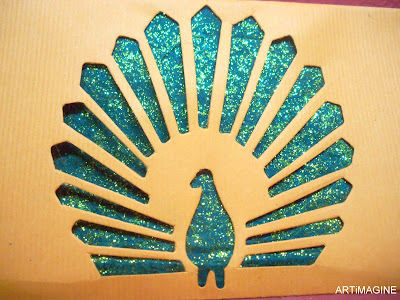
I started by cutting out the shape of the envelop on an orange chart paper. On the front of the envelop, I printed a peacock stencil and then hand cut it. 
On the inside of envelop, I pasted green and golden Chinese silk paper. Before pasting it inside, I spread golden glitter on the backside of the Chinese paper(the side peeping from the peacock).
I choose very Indian festive colors and as peacock is India's national bird and is associated with feminine beauty, it made sense to choose it, instead of any other stencil for the occasion.
And the envelop is ready to be loaded with LOT of CASH!!!


 -May ART be with you©

17 Jun 2012

DADDY COOL!!!!

I am almost in time to share my Father's day craft with you. 
I have been crazy busy, making gifts for my dad, my dad-in-law(DIL), and couple of my friend's dads.


So, here is the 1st one, its for my DIL, its a 3D decoupage picture that I created, it captures various moments that dad's and son's share, like shaving, fishing, playing guitar, cycling, sports, graduation and the largest black and white picture is of a baby holding his dad's finger and it says "everything I owe, is to you dad..."; my husband will be giving this, I hope my DIL likes it.
Its not framed yet, as my DIL isn't in town and I have time to get it framed (thanks GOD for that!!)


The next two are for my friends's dad's, the 1st one is a folding desktop card.
It carries the a large polaroid photo, which in turn has 4 different polaroid photos, which shows a boy holding his dad's hand and over looking the horizon. The card says "In all life's shades, you are still with me...HAPPY FATHER's DAY". The same picture is on the backside as well. 
The idea to create this photo came from the word "POP" and I decided to do a POP art card with Polaroid effect.


The next is a pin up card, which is made as a fusion between a comic photo and film strip and shows superman, batman and spider-man on one side of the balance scale and DAD on the other side, over weighing all of them. Its says "YOU ARE MY SUPERHERO...HAPPY FATHER'S DAY"


And the last one is for my dad. Its a 5x7" card, that shows dad clown fish looking out for daughter clown fish. It says "thanks for looking out for me..happy dad's day!!!"
My dad of course loved his card, I am awaiting the reactions of others.


oxoxoxoxooxoxoxoxooxoxoxoxo

Self Rating - 9.5/10
Status - I have never made so many projects in such limited time, and I made each of them from scratch, including creating the images for the projects, hence I am very happy with the outcome.


                                                                                                 -May ART be with you©


11 Jun 2012

PAPER WHISKY CROWNS!!!

Yesterday was my best friend's theme b'day party, the theme was "funky head and eye wear". 
The minute I heard about the theme, I was reminded of Inna's quilled owl mask that she made for her daughters, and how inspired I was to make something on my own to wear to a party.

The idea stemmed from my love for Scotch and that I consider myself KING (yes, not queen). So, I combined the two and made these Paper Whisky Crowns for myself (pink) and my husband (green).

I started by picking up images of some of my favorite Scotch, a Whisky glass(with the rocks!) and to add ZING to the crown, I added a silhouette of a pole dancer.
Here are the crowns laid flat.

I grouped all the images together and used coloring tools to give them green and pink tint.
Here is the image I made before adding the tint.

Now comes the printing part, if I had printed the image without any image on the back, the backside would have been white and would have spoilt the look, so I inverted the image and pasted it below the original one. Take a look at the picture below to understand what I did
Once the images was ready, I color printed the them (2 copies of each) and hand cut the extra black and white part of the paper.
I managed to take one picture of the process of cutting, here it is. You can see that, I have only cut the top of the images till the next one starts and not gone all the way down.
Once the images were cut, I folded the below image (image with inverted Scotch names) and pasted it behind the main image (the one with actual names). 

As mentioned earlier, I took 2 copies of each image, so now to make one long single piece, I pasted them together and punched a hole on either sides and added a woolen black string, to use it to tie the crowns.


Take a look at some close ups 

Finally, the whole deal paid off, as I got the biggest compliment ever! My friends didn't believe that I made these crowns. MISSION ACCOMPLISHED!!!!

That's us at the party with our PAPER WHISKY CROWNS!!!
xoxoxoxooxoxoxoxoxoox

Self Rating - 9/10
Status - Overjoyed by the response received from my friends and my husband.


As, Im so happy with the outcome, I am sharing the image with you'll (without the watermark). So feel free to download it, color it as per your choice and flaunt your crowns!!!!  Let me know if you need any help making it.


I would love to see pictures of you'll wearing the crowns, so please share them with me. You may mail them on nishthartimagine@gmail.com or leave them as links in comments to this post.


Also feel free to share any other crown ideas that you may have.


Till next time, PARTY HARD!!!! 


      -May ART be with you©

26 May 2012

Playmate is back!!!!

So after escaping the Playboy fever for more than a month, I have caught it again. (my last playboy themed art was on 13th April,12).
Mr.Hefner, PLEASE HELP!!!!


I was so intrigued by this photograph, that I couldn't help but make something of it.
So, I made a 3D Decoupage of it, as I love making 3D Decoupage, this is my 2nd one.
They are easy to make and bring inanimate things to life.
I used coloring tool to change the color of the original photograph to Duo tone and also added a small playboy bunny to the picture and then color printed it.
I hand cut the playboy bunnies (small yellow one and the large black one, which is the model's swim suit). I then pasted these hand cut bunnies on the photograph. 
Once both the pieces were dried, I pasted the entire photograph on a card board (you can see how bad I'm at pasting with creases on the photograph, this is cause of excess glue used).
After the card board image was dried, I pasted the blue hand-made paper frame that I made on the photograph.
Finally to hang it, I added a small inverted 'V' paper strip on the backside of the frame.


|||||||||||||||||||||||||||||||||


Self Rating - 6.75/10
Status - Happy with the idea, but execution could have been better.
Tip - use tape runner while working with thin paper for your craft to avoid creses being formed while pasting.


Am I a playboy fanatic??? 
Does this craft deserve a 6.75???
Let me know what you think


      -May ART be with you©


13 May 2012

~~~ MY DOC-MOM ~~~

After making my mom a Mother's Day card (posted on 6th May, 12), I decided to make a Mother's Day card for my would-be mother-in-law.


As she is a doctor, I wanted to make something related to her profession and hence I came up with this.
I found the stethoscope image on the Internet and added the text on my own and created this image for the card. I color printed it on a 5x7in plain paper.
To add depth and texture to the card, I pasted the printed image on a red chart paper.
Once the red bordered image was ready, I cut out a handmade Chinese paper into an unfolded card shape that would fold into half and open vertically. I then pasted the red bordered image on the front of the card.
Finally I added white chart paper on the inside to write the message. The message reads - 'To, sweetest Aunty...You are no less than my mom to me... Lots of Love -Nishtha"

Apprehensively, I gave her the card today at dinner and she loved it... (PHEW!!!)


xoxoxoxoxoxooxoxoxoxox


Self Rating: 9/10
Status: I and my Mom-in-law are happy.
Tip: Either print the message to be written inside the card or ask someone with good handwriting  to write it for you (I wrote it myself and as you can see, its not the most beautiful handwriting)

Let me know what you think of this professional themed card.


                                                                                                -May ART be with you©

P.S. - I gave my "MUMMY" themed card to my Mom and she loved it. So both my MOMs are happy. 

Happy Mother's Day.

6 May 2012

||| MOMMY RETURNS |||

The inspiration for this card came from the homonym - 'MUMMY', which mean Mother and Egyptian mummified body.
So I wanted to combine the two, make a card for my MUMMY using something of Egyptian MUMMY theme.
So, I started by cutting out an image of a girl offering a bouquet to her mom on a cardboard and covered the mom and the girl in 3mm golden quilling strips (I tried to give the effect of the way Egyptian mummies are wrapped). The bouquet was wrapped in 3mm maroon and green strips.
I then pasted the three wrapped images on a black base, which was made by covering a border-shaped cut-out cardboard with 10mm black quilling strips (again trying to replicate the Mummy effect). 
Once the image was  pasted firmly, I added colour printed writing on the side on the image - "my mommy best" (again using different kind of font to give it Egyptian look)
I then pasted the entire black cut-out with images and writing onto a black and golden handmade paper, which I cut out in the shape of a card.
Finally, I added a yellow chart paper on the inside of the card, to write the message.
Cant wait to give it to her - my MOMMY!!!!
||||||||||||||||||||||||||||||||||||||||||||||||||


Self Rating: 8.75/10
Status: I am happy with it, I hope my Mom likes it too (this is my 1st hand made card for her) 
Tips: Definitely keep a wet hand towel with yourself or you'll get dried glue all over your project.


Let me know what you made for your MUMMY.


                                                                                                -May ART be with you©


5 May 2012

Under the Cowl

I love to wrap my gifts in unique, hand made and personalized wraps, hence when I gifted the comic book 'Batman Under the Cowl' to SID-B (a Batman fanatic), I wrapped it in this Batman themed wrapping.
I started by gathering and color printing batman related images. 
For the wings, I found this cloth wings image and cropped it in two. To get the wing's folds accurately, I added dotted lines on the cropped image using coloring tools.


I then covered the comic book with black chart paper till about 70% of the length and cut out all the images gathered. 


Finally I pasted all the cut out images - the Batman logo on the front of the black cover, the mask on the inside and the folded wings on the back of the cover.


My DARK KNIGHT is ready to save the GOTHAM CITY!!!!

||||||||||||||||||||||||||||||||||||||||||||||||||

Self Rating - 9/10
Status - ELATED


Try a unique wrap yourself and share it with me.


                                                                                                -May ART be with you©