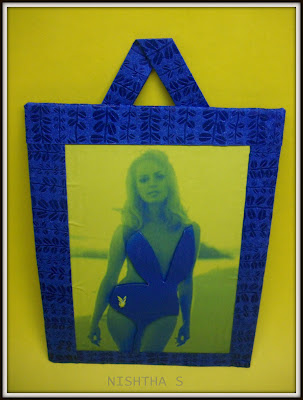
So after escaping the Playboy fever for more than a month, I have caught it again. (my last playboy themed art was on 13th April,12).
Mr.Hefner, PLEASE HELP!!!!
I was so intrigued by this photograph, that I couldn't help but make something of it.
So, I made a 3D Decoupage of it, as I love making 3D Decoupage, this is my 2nd one.
They are easy to make and bring inanimate things to life.
I used coloring tool to change the color of the original photograph to Duo tone and also added a small playboy bunny to the picture and then color printed it.
I hand cut the playboy bunnies (small yellow one and the large black one, which is the model's swim suit). I then pasted these hand cut bunnies on the photograph.
Once both the pieces were dried, I pasted the entire photograph on a card board (you can see how bad I'm at pasting with creases on the photograph, this is cause of excess glue used).
After the card board image was dried, I pasted the blue hand-made paper frame that I made on the photograph.
Finally to hang it, I added a small inverted 'V' paper strip on the backside of the frame.
Self Rating - 6.75/10
Status - Happy with the idea, but execution could have been better.
Tip - use tape runner while working with thin paper for your craft to avoid creses being formed while pasting.
Am I a playboy fanatic???
Does this craft deserve a 6.75???
Let me know what you think
Mr.Hefner, PLEASE HELP!!!!
I was so intrigued by this photograph, that I couldn't help but make something of it.
So, I made a 3D Decoupage of it, as I love making 3D Decoupage, this is my 2nd one.
They are easy to make and bring inanimate things to life.
I used coloring tool to change the color of the original photograph to Duo tone and also added a small playboy bunny to the picture and then color printed it.
I hand cut the playboy bunnies (small yellow one and the large black one, which is the model's swim suit). I then pasted these hand cut bunnies on the photograph.
Once both the pieces were dried, I pasted the entire photograph on a card board (you can see how bad I'm at pasting with creases on the photograph, this is cause of excess glue used).
After the card board image was dried, I pasted the blue hand-made paper frame that I made on the photograph.
Finally to hang it, I added a small inverted 'V' paper strip on the backside of the frame.
|||||||||||||||||||||||||||||||||
Self Rating - 6.75/10
Status - Happy with the idea, but execution could have been better.
Tip - use tape runner while working with thin paper for your craft to avoid creses being formed while pasting.
Am I a playboy fanatic???
Does this craft deserve a 6.75???
Let me know what you think
-May ART be with you©


