Translate

Showing posts with label X rated Craft. Show all posts

26 May 2012

Playmate is back!!!!

So after escaping the Playboy fever for more than a month, I have caught it again. (my last playboy themed art was on 13th April,12).
Mr.Hefner, PLEASE HELP!!!!


I was so intrigued by this photograph, that I couldn't help but make something of it.
So, I made a 3D Decoupage of it, as I love making 3D Decoupage, this is my 2nd one.
They are easy to make and bring inanimate things to life.
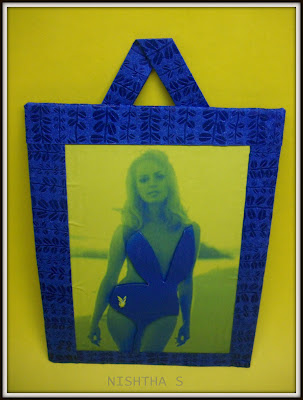
I used coloring tool to change the color of the original photograph to Duo tone and also added a small playboy bunny to the picture and then color printed it.
I hand cut the playboy bunnies (small yellow one and the large black one, which is the model's swim suit). I then pasted these hand cut bunnies on the photograph. 
Once both the pieces were dried, I pasted the entire photograph on a card board (you can see how bad I'm at pasting with creases on the photograph, this is cause of excess glue used).
After the card board image was dried, I pasted the blue hand-made paper frame that I made on the photograph.
Finally to hang it, I added a small inverted 'V' paper strip on the backside of the frame.


|||||||||||||||||||||||||||||||||


Self Rating - 6.75/10
Status - Happy with the idea, but execution could have been better.
Tip - use tape runner while working with thin paper for your craft to avoid creses being formed while pasting.


Am I a playboy fanatic??? 
Does this craft deserve a 6.75???
Let me know what you think


      -May ART be with you©


13 Apr 2012

TWO is better than ONE

I am sure this month is 'International Playboy Month', as I cant explain why I keep making Playboy/Playmate themed art project. 

Mr.Hefner, are you listening??? ;-)


Here is my latest one: TWO is better than ONE
My inspiration to make this, came from the model herself. I dont know who she is, but I loved her photo and decided to make something with it and thus was born this project (which I intend to frame soon) 
I used coloring tools to give the original picture a 'negative of a photograph' look.
I colour printed the edited photo and stated to work on it.


The 1st one is made with IRIS folding technique, for which I have hand cut the parts out (used my craft knife for the 1st time)
I used 3 fluorescent colours - Pink for the lingerie, Green for the bunny ears and Yellow for the playboy bunny in the basket.
I experimented with IRIS folding this time, instead of using paper strips, I folded a single piece of paper and pasted it. It worked great, looks just like the actual IRIS folding.


The 2nd one is 3D decoupage, this is my 1st decoupage project. 
I used all the hand cut parts from the previous picture to make this one.
To give it the 3D effect, I pasted small pieces of cardboard on backside of each hand cut part and pasted it on the original picture. 
Finally, I pasted both the finished pictures on Indigo Blue paper and added the golden and turquoise hand made paper border to give it a complete look.


||||||||||||||||||||||||||||||||||

Self Rating - 8/10
Status - Happy with the outcome
Tips - you could use double sided tape instead of cardboard for 3D decoupage
Suggestions - Try the new IRIS folding method and let me know how it worked for you.
Changes I could make - would definitely get it framed


Let me know what you think? Do i deserve a 8/10???


      -May ART be with you©


7 Apr 2012

P.E.E...

After creating the Playboy bunny and, playmate themed gift wrapping paper for Easter (posted on 4th April 12), I wanted to make more, but with the same Playboy theme {cant get Playboy bunny out of my head, I'm sure Mr.Hefner will be delighted ;-) } 


So I created P.E.E. -- Playboy Easter Egg:


It has a vintage worn out feel to it, I didnt intend that to happen, but in the process of making, it did (works out even better for me)


I used a real boiled egg (as I couldn't find a craft egg), covered it with hand torn white paper to give it a base.


I applied 2 cotes of glue and water mixture (70% glue & 30% water) to strengthen the paper base.
For the bunnies, I colored printed the below image, and tore the bunnies out by hand and pasted them all over the egg.


To further strengthen the egg after pasting the bunnies, I coated it with glue and water mixture and left it to dry over night.


Once completely dried, I sprayed it with varnish to give it a sheen.


Finally , I mounted the finished egg on a black quilled stand.


|||||||||||||||||||||||


I give myself 6/10 for this project. I'm satisfied with it, but not delighted.


What do you think? How much would you rate it???


                                                                                                -May ART be with you©

4 Apr 2012

Happy (Naughty) Easter...


I have been so bombarded (inspired) with Easter craft and projects made by my fellow crafters, that I couldn't help but make something based on Easter, but I didn't want to stick to the stereotypical cards/eggs(nothing wrong with them, each one is gorgeous in its own self, but I wanted to do something different), so I made this gift wrapping paper.


It is a Playboy bunny and Playmate themed vintage paper with 'Happy Easter' written on it. 
I used Playboy bunny instead of the Easter bunny and the Playmate is wearing bunny ears (which is my way of capturing Easter).

Closer look at the picture


I used this to paper to wrap my friend Chrissa's gift


I made a paper bag with a satin tie (I love using tie on a gift wrap)


I colour printed the design and pasted the ends horizontally. 


I then pasted the bottom, inserted the gift and folded the top and finally added the satin tie.

A closer look at the design


I hope my friend likes her wrapping as much as her gift..


-May ART be with you©

27 Mar 2012

Its all about being safe ;-)

As I have learnt IRIS and quilling, I wanted to combine the two and make a card (I am so inspired by beautiful cards made my fellow crafters). I love funny and quirky cards and that's what I wanted to make.


In an endeavor do to so, I came up with this card idea. 


Its made of quilled sperms yelling 'ATTACK!" and raging towards IRIS condom who is protecting against 'INTRUDERS!' (I'll tell you, what occasion is the card for, later)


The sperms are made of 3mm white and grey quilling strips. I glued them together and then quilled half of the strips and curled the remaining half.


The IRIS condom is made of dark and light pink metallic paper to give it realistic look. {striped condom ;-) }


The card opens and reads: Dear Andy, In life you'll be faced with many outside intruders, I wish you protection from internal ones (at least).. Wish you and Cindy, a very happy and stress free married life..Lots of Love, Dan.


YES, its a card wishing well for married life. 


-May ART be with you©